 Creative Life Scrapbooking Blog Hop
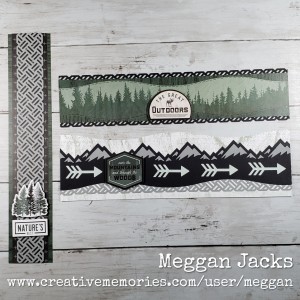
I am so excited to be taking part in my first Creative Life Scrapbooking blog hop! I’ve created three simple scrapbook borders from Creative Memories‘ newest collection, Beneath The Pines. Living in the Pacific Northwest, this collection is a MUST HAVE for me and I really enjoyed playing with papers, stickers and mats. I hope you enjoy these borders!
Supplies needed (all may be found in my online store or from your personal Creative Memories Advisor)
- Beneath the Pines Designer Paper and Stickers
- Black Cardstock
- Gray Cardstock
- Basketweave Border Punch
- Majestic Mountains Border Punch
- Arrow Border Maker Cartridge
- 12 inch Rotary Straight Trimmer
- 12 inch Decorative Trimmer
- Black Dual Tip Journaling Pen
- Repositionable and Permanent Tape Runners
- Foam Dots
Scrapbook Border 1 – The Great Outdoors


- Using the 12 inch decorative trimmer with the gentle wave, cut the bottom of the tree silhouette paper just enough to create the swell. Turn the paper around, mirror the swell and cut at 2 inches (so the strip will be 2 inches wide at the widest point.)
- Cut the dark green bark texture paper at 2.25 inches (create a 2.25×12 strip of paper.) Using the tape runner, layer the tree silhouette paper on top of the bark paper, centering it.
- Using black cardstock, punch a border with the Basketweave Border Punch. Use the rotary trimmer with straight blade to trim border in have length wise. Use repositionable adhesive to adhere to back of bark paper, exposing about 1/4th of an inch at the top and bottom.
- Use the fine tip of the Black Dual Tip pen to create faux stitching on the tree shilouette part of the border
- Use foam dots to adhere the “The Great Outdoors” sticker to the border.
I paired this scrapbook border with the tan tree ring paper that compliments the tan in the title sticker.
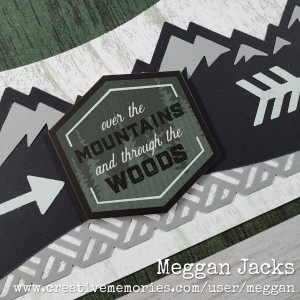
Scrapbook Border 2 – Over the Mountains
- Using the 12 inch decorative trimmer, trim the white bark paper at 3.5 inches.
- Using black cardstock and the Majestic Mountains Border Punch, punch a border and trim with the decorative trimmer at so that the top of the mountain to the trim line on the ends of the trimer is approximately 2 3/8 inches.
- Use the Basketweave Border Punch to make a border with gray cardstock adhere to the back side of the black mountain border as shows in the sample. Then adhere both pieces to the white bark paper.
- Using gray cardstock, punch a Majestic Mountain border. Use the leavings from the Majestic Mountain punch to fill in the holes of the black mountain border.
- Using foam dots, attach the “Over the Mountains…” hexagonal sticker.
- Using the minty green paper with the tiny trees, punch 4 arrows using the Arrow Border Maker Cartridge. Adhere as shown.
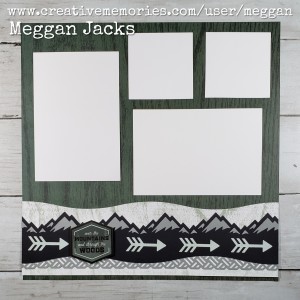
I paired this scrapbook border with the dark green bark paper.
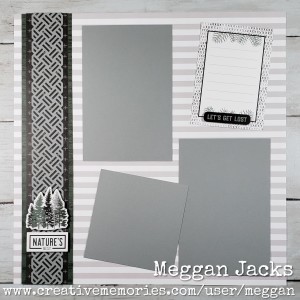
Scrapbook Border 3 – Nature’s Best
It does not get any simpler than this border, but I love that it can easily go from horizontal to vertical depending on the needs of your page(s).
- Cut the dark green bark border at 2.25 inches
- Cut the black with gray + sign paper at 1 7/8 inches
- Punch a gray cardstock border with the Basketweave Border Punch
- Layer as shown
- Use foam dots to adhere the Tree and Nature’s Best stickers
I paired this scrapbook border with the gray and white stripe paper

The Creative Life Scrapbooking Winter 2020 Blog Hop
Thank you for stopping by and be sure to check out all of the other stops along the way. Next on the Creative Life Scrapbooking Blog Hop is Tammy with Photos2Albums!

[…] Stop 6: Meggan from The Printed Project […]
Beautiful – Love the mountains with the arrows!!!
Beautiful borders Meggan!
Great borders! Love the combinations of punches!